I recently had the pleasure of attending a Kubernetes workshop, led by Jérôme Petazzoni, and hosted by Women Who Code Portland community. This post is a summary of my experience, with some info from the official Kubernetes website, and is intended to familiarize the reader with all the basic concepts of Kubernetes.
What is Kubernetes?
Kubernetes (sometimes referred to as k8s) is an orchestration (management) system for containerized applications. It is an open-source tool, originally developed by Google and first released on June 7, 2014.
It is designed to address problems of deployment, management and scaling of containerized (usually microservice-based) applications. It also provides internal mechanisms for load balancing, implements its own Service Registry / Service Discovery, enables the system to self-heal and helps with configuration/secrets management.
Spotify has recently started migrating its services to Kubernetes. Prior to adopting Kubernetes, it could take an hour to fire-up a new service in production. With Kubernetes, this time went down to order of seconds and minutes. Spotify has also used Kubernetes to build Slingshot, a custom solution that would create a temporary staging environment every time a pull-request is created. This migration process started in late 2018, and a year later only a small percentage of Spotify services is migrated.
However, while there are definitely a lot of benefits of using Kubernetes, the decision to adopt it should be well-thought. Using Kubernetes for something small like a mobile app or a monolithic web-app would probably be an overkill. Initial setup and maintenance costs of keeping a Kubernetes cluster can add up pretty fast.
You might want to consider the possibility of migrating to Kubernetes if any of the following is true for you:
- Architecture of your application allows you to scale things horizontally (by running more instances of a microservice, for example) in production environment.
- Your application can’t be easily run locally.
- You have a large and/or distributed team, and maintaining consistency across dev environments for the team is hard.
Kubernetes Architecture

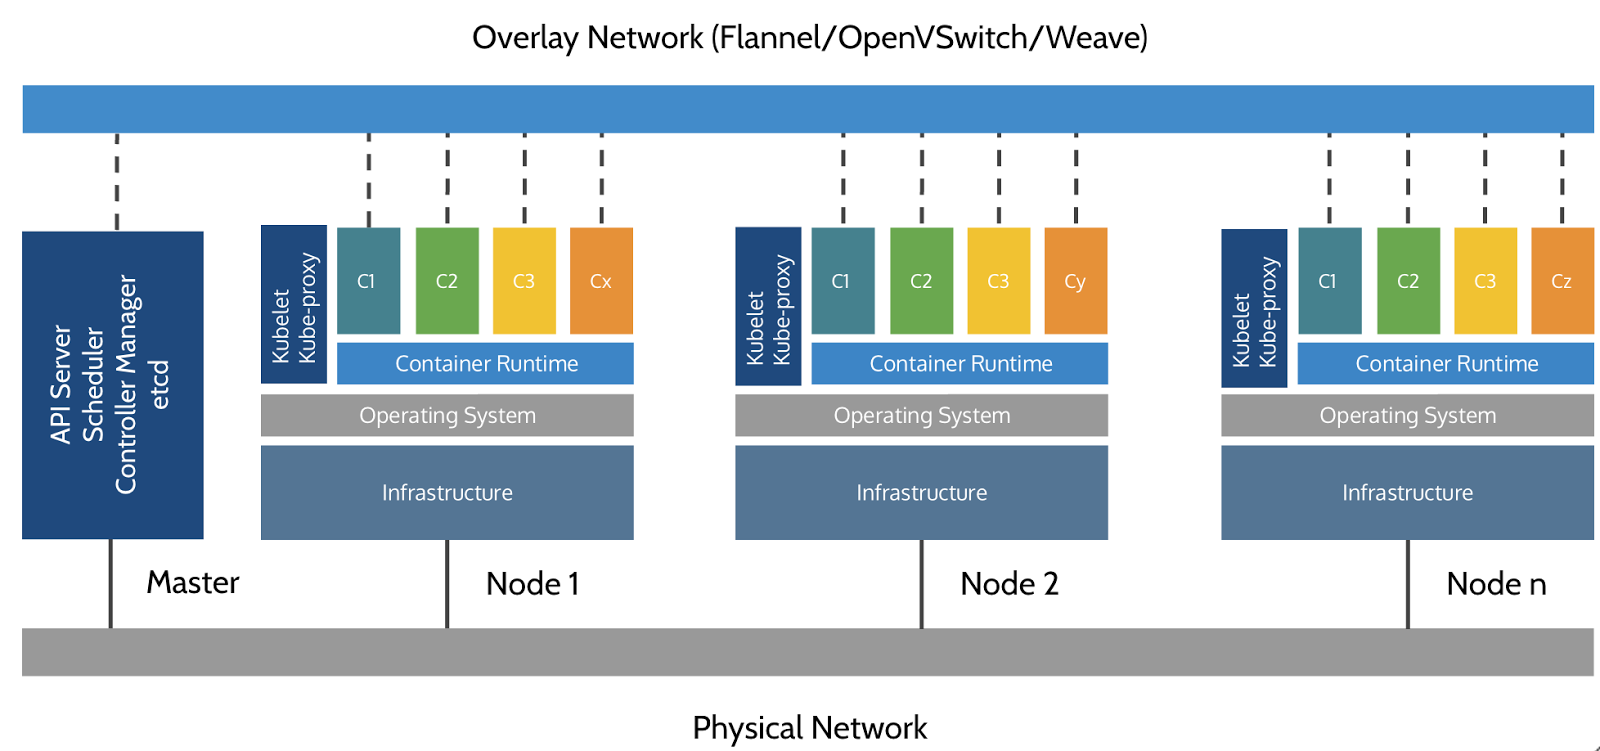
Simplified representation of a Kubernetes cluster by Imesh Gunaratne.
Here are the basic elements of a Kubernetes Cluster.
Node(s)
A Kubernetes Cluster contains a number of Nodes, each running the following services:
- a containerization engine (typically, Docker);
- the “node-agent” (kubelet);
- the network proxy (kube-proxy).
Nodes represent the machines (physical or virtual) in the Cluster. The applications you run in Kubernetes are actually run on the Nodes.
Control plane/Master
The control plane (also referred to as “master”) is the “brains” of each cluster and consists of the following services:
- an API server used to interact with the cluster (kube-apiserver);
- a highly-available key-value store, the “database” of the cluster (etcd);
- a number of additional services, used for scheduling, cloud integration, etc.
The control plane is typically hosted on a special reserved node (which is then called “master”). The exception is single-node development clusters, like minikube. When high availability is required, each service of the control plane must be resilient. The control node is then replicated on multiple nodes, which is sometimes referred to as “multi-master setup”.
Overlay network
Overlay network is another logical network built on top of physical network between Nodes. It is used for communication between Pods. For more in-depth details on Kubernetes Networking Model, you can read this article on Kubernetes website.
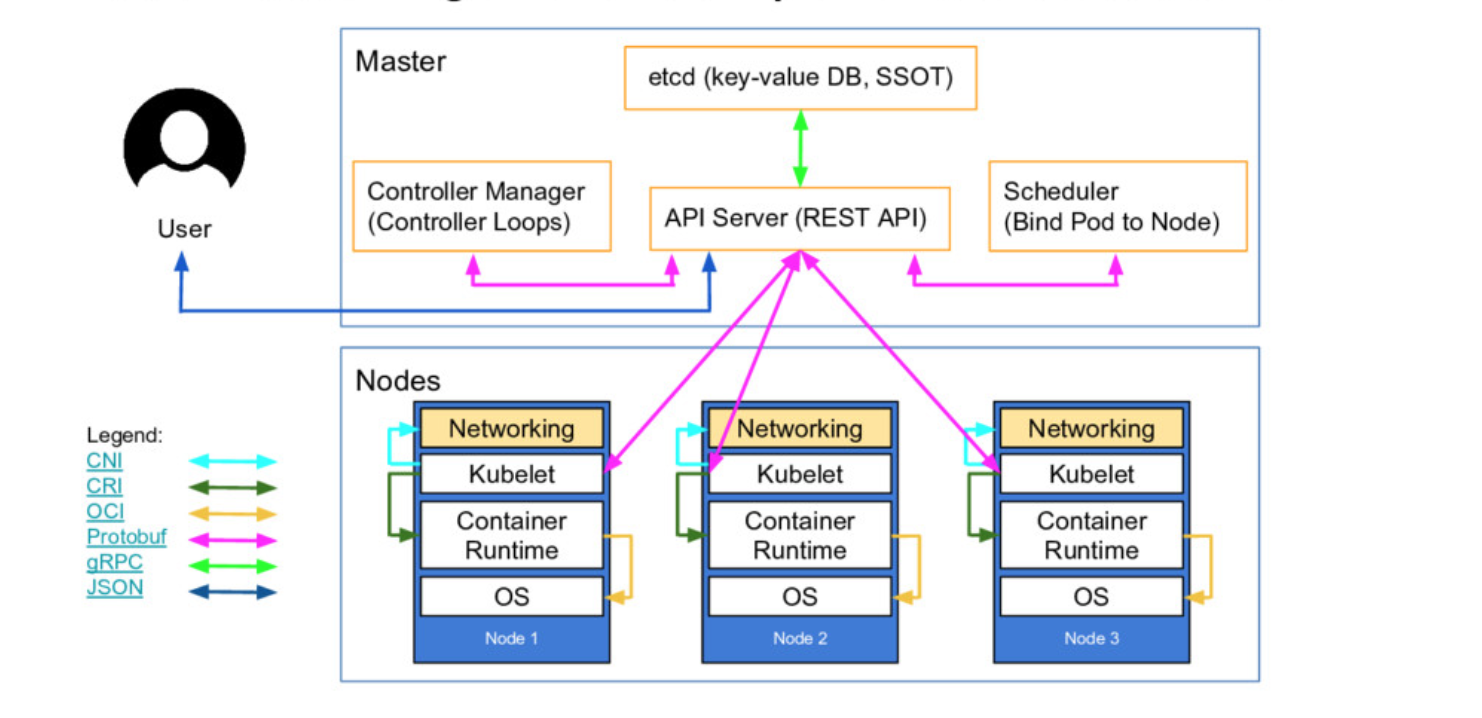
The next diagram shows more details on Kubernetes Architecture and the interactions between components of a cluster.
 Kubernetes Architecture by Lucas Käldström.
Other Kubernetes Concepts
Pod
A Pod is the basic execution unit of a Kubernetes application – the smallest and simplest unit in the Kubernetes object model that you create or deploy.
A Pod can consist of one or several containers, storage resources which are shared between containers, and has a unique network IP-address. A Pod represents a single instance of an application. However, the most common scenario is “one-container-per-Pod”, and in this case you can think of the Pod as of the wrapper around the container. Kubernetes then manages the Pod, not the container itself.
Service
A Service is an abstract way of exposing an application running on a set of Pods as a network service. For example, you might have a set of Pods (let’s call them “backends”), that provide some functionality to another set of Pods (let’s call them “frontends”). How do frontends know the network IP-addresses of backends at any time? In order to abstract this problem away, the Service concept is introduced. You can declare “backends” Service, consisting of that set of Pods, and then address them by the Service name. Kubernetes will then take care of their actual IP-addresses, keep that link up-to-date as Pods behind that Service replace each other.
Volume
A Volume is another abstraction that was introduced in order to solve:
- the problem of data persistence between re-runs of a Container (you can’t store data in files inside a Container - it always starts with a clean state);
- the problem of sharing data between several Containers. The Volume is a part of Pod that encloses it, and thus it has the same time-to-live (TTL) as the enclosing Pod. Consequently, a volume outlives any Containers that run within the Pod, and data is preserved across Container restarts.
Interactions with Kubernetes Cluster: API & kubectl
All the interactions between the user and the Cluster are made via the web-API server in the cluster master (control plane). Kubernetes API is (mostly) REST-ful. It allows users to create, read, update and delete resources. Nodes, Pods, and Services are examples of resources that can be managed via Kubernetes API.
kubectl is a rich CLI tool around the Kubernetes API. In order to use kubectl to interact with a Kubernetes Cluster, one needs:
- an address of the Cluster API;
- a TLS certificate used to authenticate with the Cluster API.
kubectl can be provided with the needed info in several ways:
- using a config file in the default location - ~/.kube/config;
- pointing to a config file in some other location using --kubeconfig flag;
- setting those properties separately using --server, --user, etc. flags.
get command
The get command is used to display one or many resources. For instance, running kubectl get nodes lets you take a look at Cluster composition, returning the list of Node resources available to Cluster. kubectl get can be used to get machine-readable output in JSON or YAML formats, using the -o flag: kubectl get nodes -o yaml.
describe command
The describe command is used to show details of a specific resource or group of resources. It needs a resource type and (optionally) a resource name. It is also possible to provide a resource name prefix and all the matching resources will be displayed then.
Namespaces
Namespaces are designed to segregate resources. For instance, all the internal resources of a Cluster (like the master resources / Kubernetes resources on nodes) belong to kube-system namespace. By default, all kubectl commands are run in the default namespace. You can specify namespace using -n/--namespace flag with almost every kubectl command: kubectl get nodes --namespace=kube-system. You can also use -A/--all-namespaces flag with most commands that manipulate multiple objects.
More info on kubectl can be found on the tool’s documentation website.
Hands-on Experience
You can get a proper hands-on experience similar to what was offered by the workshop I’ve attended, just follow these steps.
- You will need a Docker Hub account in order to work with classrooms offered by Docker. Go to https://hub.docker.com/signup to get one, if you haven’t already.
- If you don’t feel comfortable enough around Docker, you can probably start with this free virtual Docker classroom. There are a lot of labs and exercises you can do to get some hands-on experience with Docker. The instructions are pretty straight-forward.
- Finally, go to this free virtual Kubernetes classroom and check out the virtual workshop offered by them. In fact, it is created by the author of the workshop I’ve attended, Jérôme.
Conclusion
Over the last few years, Kubernetes has proven itself as a tool that literally changes the development and delivery processes for the better in many companies. It is capable of removing the human factor from the equation in all things deployment, scaling, and system management. It helps Google, Spotify, and Soundcloud manage their enormous planet-wide infrastructures smoothly, and at the same time, it helps smaller teams, providing them with tools to quickly deploy feature builds for testing on separate environments.
I am pretty confident that Kubernetes (or similar tools) will continue conquering the IT industry. And while it has a pretty steep learning curve, investing some time to familiarize yourself with this prominent piece of technology today is crucial in order to not fall behind.